Showing posts with label home decor. Show all posts
Thursday, April 28, 2011
Fleece Flower Pillows
SUPPLIES:
Fleece (1/2 yard in the color of your flower, plus some coordinating scraps for the center and leaves) You could also use felt, but I think fleece is softer!
Scissors
Hot Glue Gun
DIRECTIONS:
1. Cut two circles out of your fleece. The size is up to you. I traced a large bowl and my circles were about 14". Sew (or hot glue) around the edges, leaving an opening for stuffing. Next, using a piece of chalk or marking pen, trace a smaller circle for the center of your flower and three additional rings to make a bullseye design.
2. Cut out four leaf shapes. I just eyeballed them. Then sew the leaves together along the outside edges and add stitched leaf veins. (You could also just hot glue the edges and draw the veins on with fabric paint or markers.)
3. Add stuffing to your pillow and stitch (or glue) closed the opening. I then used pinking shears to trim the edges of the pillow and leaves to make it a little more decorative (optional).
4. Using hot glue, attach the leaves to the edge of your pillow. The edges are "pinked" and the leaves are attached.
5. Cut out a bunch of petals. Again, I just eyeballed a petal-like shape. You could make them wider/narrower/more rounded/more pointed, etc. depending on what you want your flower to look like. I made them in two sizes, a larger one for the outer petals, a smaller one for closer to the center. I actually cut out and used a lot more, probably 50-60 or so.
6. Starting on the outer ring of the bullseye you traced, start gluing down your petals. I found it worked best to put a line of glue along the bottom of the petal, pinching the center to give it a little dimension, then attaching it.
7. Once the outer row is complete, start working on the next ring of petals. I added an additional drop of hot glue to each petal to help hold it down and cover the line where the first ring of petals were attached. Use an additional drop of glue on the inner rings of petals.
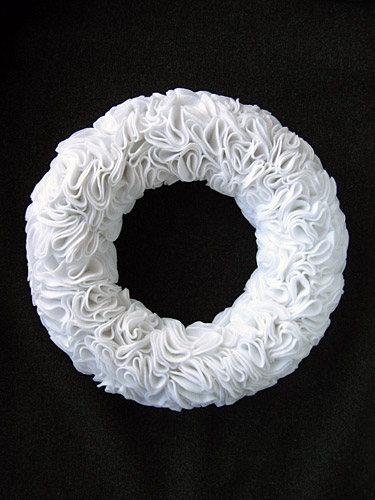
8. Keep adding petals until your flower is complete. I used the larger petals for the outer two rows, a mix of large and small for the next row, and all small petals for the inner row.
9. Cut out some circles to create the center of your flower. (I used pinking sheers again). For each circle, add a bit of hot glue to the center and squish it to form a little ruffle-y shape and attach them to the center of your flower to fill it in.
Source: http://cometogetherkids.blogspot.com/p/ideas.html
Wednesday, March 2, 2011
Homemade Wall Stickers
http://brandyscrafts.blogspot.com/2010/05/contact-paper-cardstock-wall-decals.html
I am lovin' this idea for DIY vinyl wall stickers! Definitely on the to do list for my basement and maybe the girl' rooms, too!

Saturday, June 26, 2010
Dollar Store Cake Stands
SOURCE: http://www.joyshope.com/2010/06/carnival-of-tiered-trays.html
But first you need to head to Dollar Tree and pick up:
One tube of Super Glue Fix-All Adhesive,
three silver-esque trays,
two crystal-esque candlesticks,
per tiered tray that you plan to make.
Be warned.
You will want to make many more than just one.
Many, many, more.
On your way home stop by your fave hardware or craft store to get
spray paint,
spray primer &
a mask.
This is stinky business.
Also get a canvas tarp if you don't have one.
First spray the front and back of each tray and candlestick with primer.
Sort of an annoying step, but so very worth it, considering how shiny and smooth they are.
This will help the color stick and stay on through what is sure to be many a use.
Then start your rainbow party.
Two to three light coats is the way to go.
Be patient. Spray paint dries fast, but drips and goops if you get all crazy and lay it on too heavy.
Spray the bottoms of the trays too, since you will be able to see them, if even just a little.
Run a bead of glue along the bottom of each candlestick and then press it to the center of the bottom of two of the trays.
Let dry.
By using the candlesticks upside down, you get more useable area on your trays.
When the glue is dry, flip it over and attach the third tray on top.
Again, let dry with added weight for better adhesion.
When this tier is dry, add the other tray and candlestick beneath it.
Let dry.
{Keep in mind that these trays are NOT food safe or dishwasher safe.}
Ruffle Felt Rosette Wreath
SOURCE: http://www.domestifluff.com/2009/11/how-to-make-a-ruffly-felt-rosette-wreath/
What you’ll need for the wreath:
- a 12 inch styrofoam wreath form
- approximately 2 1/2 yards of felt
- straight pins (enough to match the number of felt circles needed, plus two for attaching the hanger)
- scissors
- a 3 inch circle template
- a pencil
- ribbon for hanging
Using a pencil and your circle template (or that great tutorial from maya*made), trace circles onto the felt. Cut the felt circles, and fold them in half twice to form rosettes. Insert a pin near the bottom corner of the rosette, about 1/8 inch from the corner.
Attach the felt rosettes to the wreath form, making sure to group the rosettes tightly enough that no styrofoam is showing through the rosettes. After you’ve added a few, fluff and adjust the rosettes to your liking. Continue making, pinning, and attaching the rosettes until you’ve worked your way around the wreath form. If you have circles that are slightly misshapen or that have a little pencil or ink on them, place them toward the outside or inside edges, where they can’t be seen when the wreath is hanging.
This is what my wreath looked like on the back when I was finished. As you can see, I started off with ball point straight pins, but I switched to flat head pins when the rosette count started to get up there and I had to run out and buy more pins. If you use flat head pins, then I suggest using a thimble to push them into the wreath form, or your thumb will take a beating. Ask me how I know.
After you’ve finished adding the felt rosettes, cut a 5 inch length of ribbon, fold it in half, and attach it to the wreath form with two pins to form a hanger.
Hair Bow Holder
SOURCE: http://mommymeatloaf.blogspot.com/2010/02/little-girl-hairbow-holder.html
After making all the hairbows for my daughter during the blizzard, I decided I better find somewhere to keep them. I wanted to keep them so that I could easily tell what bows she had, but I also wanted it to be cute. I decided to make this cute little face; its just like one I had as a kid.
So, I took a piece of cardboard, traced a bowl to make a circle, and cut it out. I covered the circle with stuffing (because I was out of batting). I then took an old pillowcase and covered the circle, flipped it over, and hot-glued it to the cardboard. I glued a piece of ribbon on the back to hang it from.
To make the hair, I took yarn and made 3 sections with 10 pieces each. I tied them at the end and then braided them together (to keep it tight, I actually tied it to the cabinet while braiding). I then glued the braid around the face and added some bangs.
To make the face, I cut eyes and a mouth out of felt and glued them on.
Thursday, May 13, 2010
Prayer Wall Canvas
Source: http://www.inspiremecrafts.com/inspireme_crafts/gifts/page/3/
The saying goes:
"Matthew, Mark, Luke and John.
Bless the bed that I lie on.
Four corner to my bed,
Four angels 'round my head.
One to watch and one to pray,
And two to guide me through the day."
MATERIALS:
Canvas
Paint
Foam paint brush
Cricut cut letters or stickers
Ribbon
Embellishments
Glue
Scissors
HOW-TO:
1. Start by painting your canvas. I started with a light blue, then added some depth with a little green and darker blue. I just blended them here and there until I found a combo that worked for me.
2. Cut out letters with Cricut machine or use stickers. I measured the canvas and counted out the letters in each line to make sure I chose the right size letters to use.
3. Lay out the letters on the canvas. Start gluing once they are in place. I used the Martha Stewart Extra Fine glue pen. It worked great.
4. Add any embellishments you would like. I cut out a cross and glued a brown bead to the center and then glued to the corner
5. Glue (I used glue gun) the ribbon around the canvas.
6. Cut two strips of ribbon to your desired length to use to hang. Its always better to go long and then cut them. Glue to the back of the canvas. Then bring the two pieces of ribbon together to tie a bow. Cut any excess ribbon off.
Wednesday, May 12, 2010
I *HEART* You Blocks
Source: http://www.inspiremecrafts.com/inspireme_crafts/fathers_day/
MATERIALS:
1 wood block ( I chose a 4x4 inch)
4 photos (need the letters you want to take the photos). I had photos printed at store for top quality.
Mod Podge or your favorite decoupage
Black paint
2-4 Foam brushes
Scissors
HOW-TO:
1. Paint your wood block black (or your chosen accent color) on all sides. Let dry
2. Cut your pictures to size.
3. Apply thin coat of Mod Podge to back of picture. Adhere to wood block. Smooth out bubbles by using a cloth over the picture. Repeat on each side. Let dry according to directions on decoupage. Usually 20 minutes.
4. Apply coat of Mod Podge over the top of picture and block. You may have to do a couple of pictures at a time, let dry and then do the others. Make sure to get the corners and sides of the pictures as well.
Note: It helps to rest the block on a cup upside down or something similar so the Mod Podge doesn't adhere to the newspaper you may have underneath for dripping.
5. Let dry overnight.
6. Give to a loved one. J
Chalkboard Game Table
2539 - FolkArt ® Chalkboard Paint - Orange, 8 oz.
2542 - FolkArt ® Chalkboard Paint - True Blue, 8 oz.
2543 - FolkArt ® Chalkboard Paint - Purple, 8 oz.
901 - FolkArt ® Acrylic Colors - Wicker White, 2 oz.
938 - FolkArt ® Acrylic Colors - Licorice, 2 oz.
Masking tape
¾" Paint brush
Graph paper
Pencil
1. Basecoat the bottom on table with licorice.
2. Divide the top in 4 squares. Tape off with masking tape and paint each square with chalkboard paints, true blue, purple, red and orange. Allow to dry.
3. Using the graph paper, mark where you would like the dot for the dot game to go. Poke a hole where you have made your mark on paper. Center the dots onto one of the squares and with a pencil mark where each hole is located. Using the end of the paint brush or the end of the pencil add white dots where pencil marks
were made.
4. For the tic tac toe game tape off 1/4" stripes in the center of the square that is diagonal from the dot game. Allow to dry.
Another Monogram Wall Letter Idea
Wood Letter
Paper
Ribbon
Stickers or Cricut cut letters
Embellishments
Mod Podge and foam applicator
Glue
Glue gun
Spray adhesive
Scissors
HOW-TO:
1. Trace letter onto piece of paper. Cut out. Ink edges
2. Using spray adhesive adhere paper letter to wood letter
3. Apply stickers (or other letters to spell name) to background paper and cut out desired squares. Ink edges.
4. Adhere small name letters to the large letter.
5. Apply Mod Podge or some finishing product.
6. Using glue (I prefer glue gun) apply ribbon to the outside of the letter. Start at the bottom where it won't be very visible.
7. Adhere ribbon to the back of the letter to create your hanger
8. Add any embellishments.
Tuesday, May 11, 2010
Framed Crayon Monograms
I thought these would be super cute in the play room using my girls' initials . . . now just to find the time to do it!
http://testosteronetimesthree.blogspot.com/2007/12/teacher-gifts.html
Subscribe to:
Posts (Atom)


