Showing posts with label crafts. Show all posts

Wednesday, April 27, 2011

Messy Painted Pig

Print out or draw a picture of a pig.
Mix equal parts of shaving cream and glue.

Add some brown paint to make it look like mud.
Add the mud to the pig.
When finished, the paint will dry puffy.

SOURCE: http://ourcraftsnthings.com/page/4/

Wednesday, March 2, 2011

Fish Cracker Ocean Preschool Craft

Fish Cracker Ocean Preschool Craft


Fish crackers aren’t just for snack time, they’re for craft time too! Their fun shape are familiar to preschoolers and make a great addition to this Fish Cracker Underwater Scene Preschool Craft. It is very simple to make and even the young ones will have fun. Just make sure you have enough set out to munch on while making this cool craft with your preschooler!


What You Need
Fish Crackers
Blue Paper
Green Paint
Sandpaper
Scissors
Glue
Paint Brush

How To Make It
Step One:
Have your preschooler paint seaweed onto the blue paper with the green paint.
Step Two:
Parent: draw a starfish shape onto the sandpaper. Then let your preschooler cut out the shape. This may be a little tough depending on the type of sandpaper you are using so you may have to helpl.
Step Three:
Glue the starfish onto the blue paper at the bottom of the “sea.”
Step Four:
This is the best part – glue the fish onto the paper so they appear to be “swimming” in the sea. You’re done!

Variations
You can change the shape of the background and cut it into the shape of a gold fish bowl to change the project a little.

Source: http://crafts.preschoolrock.com/index.php/crafts/fish-cracker-ocean-preschool-craft

Rain, Rain, Go Away!

Rainy Day Umbrella Preschool Craft


Stuck inside with your preschooler on a rainy day? Short on craft supplies? Then improvise! Check your pantry, bathroom, closets – you can find something in almost any room to use for a craft. This Rainy Day Umbrella Preschool Craft uses colored sugar and cupcake baking cups from the pantry and cotton balls from the bathroom. Gather up a few things and get creative!

What You Need
Sheet of Paper – any will do
Glue
Scissors
Cotton Balls (or even marshmallows!)
Blue Colored Sugar (or glitter if you have it)
Baking Cups (cupcake papers)
Chenille Stems (or tooth picks, spaghetti noodles, etc. for the handle)

How To Make It
Step One:
Spread glue all over the piece of paper and sprinkle the blue sugar “rain.”
Step Two:
Stretch out some cotton balls and glue onto paper to make “clouds.”
Step Three:
Cut three baking cups in half and glue onto paper for the “umbrellas.”
Step Four:
Add handles to your umbrella with the chenille stems or whatever else you have to use. Now you’re done with your rainy day scene!

Source: http://crafts.preschoolrock.com/index.php/crafts/rainy-day-umbrella-preschool-craft

Friday, August 27, 2010

Paperplate Snowman

Source: http://www.notimeforflashcards.com/2008/12/best-of-2008-count-down-3.html


Gather your materials. You will need a paper plate, some orange and black construction paper, 2 buttons, some sequins, sparkles, contact paper, scissors, double stick tape, a stapler, and some ribbon. I also used some paint because my son wanted to paint and I like how it looks but you can skip this step if you want.


Have your child paint the paper plate, and let dry. If you use a sponge paint brush the paint will go on lightly and dry fast.

While they do that cut out a nose from the orange paper, a hat and some coal for the mouth.

Cut a rectangle of contact paper and fold in half , make sure it’s big enough to cover the hole you will be cutting in the plate.

Peel back the contact paper backing and let your child shake the sparkles on it.

Add some sequins.

Fold the contact paper so it sandwiches the sparkles , seal it. You may have to use some tape to make sure it’s sealed and nothing falls out.

Cut out the middle of the plate.

Add glue to the cutout middle for the coal mouth, nose and hat. Obviously older kids can do this themselves but it gives toddlers a great guide to be independent.

Add the face pieces.

Add the button eyes.

While your child is adding the face pieces , attach the contact paper to the inside of the paper plate ring, I used double stick tape cause it holds contact paper well.

Staple the face to the belly, I use staples with coated paper plates because glue doesn’t always work very well.

Add the ribbon as a scarf to cover the staples.

Saturday, June 26, 2010

Dollar Store Cake Stands


SOURCE: http://www.joyshope.com/2010/06/carnival-of-tiered-trays.html
But first you need to head to Dollar Tree and pick up:

One tube of Super Glue Fix-All Adhesive,

three silver-esque trays,

two crystal-esque candlesticks,

per tiered tray that you plan to make.

Be warned.

You will want to make many more than just one.

Many, many, more.

On your way home stop by your fave hardware or craft store to get

spray paint,

spray primer &

a mask.

This is stinky business.

Also get a canvas tarp if you don't have one.


First spray the front and back of each tray and candlestick with primer.

Sort of an annoying step, but so very worth it, considering how shiny and smooth they are.

This will help the color stick and stay on through what is sure to be many a use.

Then start your rainbow party.

Two to three light coats is the way to go.

Be patient. Spray paint dries fast, but drips and goops if you get all crazy and lay it on too heavy.

Spray the bottoms of the trays too, since you will be able to see them, if even just a little.

Run a bead of glue along the bottom of each candlestick and then press it to the center of the bottom of two of the trays.

Let dry.

By using the candlesticks upside down, you get more useable area on your trays.


When the glue is dry, flip it over and attach the third tray on top.

Again, let dry with added weight for better adhesion.

When this tier is dry, add the other tray and candlestick beneath it.

Let dry.

{Keep in mind that these trays are NOT food safe or dishwasher safe.}

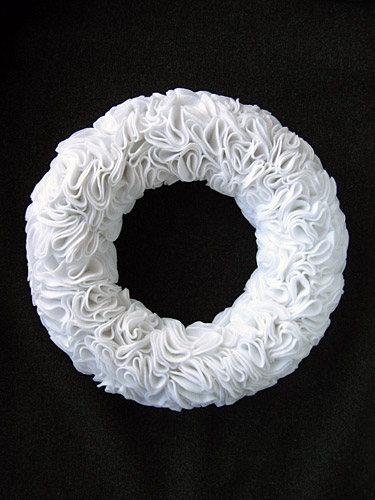
Ruffle Felt Rosette Wreath


SOURCE:  http://www.domestifluff.com/2009/11/how-to-make-a-ruffly-felt-rosette-wreath/

What you’ll need for the wreath:
- a 12 inch styrofoam wreath form
- approximately 2 1/2 yards of felt
- straight pins (enough to match the number of felt circles needed, plus two for attaching the hanger)
- scissors
- a 3 inch circle template
- a pencil
- ribbon for hanging


Using a pencil and your circle template (or that great tutorial from maya*made), trace circles onto the felt. Cut the felt circles, and fold them in half twice to form rosettes. Insert a pin near the bottom corner of the rosette, about 1/8 inch from the corner.

Attach the felt rosettes to the wreath form, making sure to group the rosettes tightly enough that no styrofoam is showing through the rosettes. After you’ve added a few, fluff and adjust the rosettes to your liking. Continue making, pinning, and attaching the rosettes until you’ve worked your way around the wreath form. If you have circles that are slightly misshapen or that have a little pencil or ink on them, place them toward the outside or inside edges, where they can’t be seen when the wreath is hanging.

This is what my wreath looked like on the back when I was finished. As you can see, I started off with ball point straight pins, but I switched to flat head pins when the rosette count started to get up there and I had to run out and buy more pins. If you use flat head pins, then I suggest using a thimble to push them into the wreath form, or your thumb will take a beating. Ask me how I know.

After you’ve finished adding the felt rosettes, cut a 5 inch length of ribbon, fold it in half, and attach it to the wreath form with two pins to form a hanger.

Hair Bow Holder

SOURCE: http://mommymeatloaf.blogspot.com/2010/02/little-girl-hairbow-holder.html


After making all the hairbows for my daughter during the blizzard, I decided I better find somewhere to keep them. I wanted to keep them so that I could easily tell what bows she had, but I also wanted it to be cute. I decided to make this cute little face; its just like one I had as a kid.


So, I took a piece of cardboard, traced a bowl to make a circle, and cut it out. I covered the circle with stuffing (because I was out of batting). I then took an old pillowcase and covered the circle, flipped it over, and hot-glued it to the cardboard. I glued a piece of ribbon on the back to hang it from.

To make the hair, I took yarn and made 3 sections with 10 pieces each. I tied them at the end and then braided them together (to keep it tight, I actually tied it to the cabinet while braiding). I then glued the braid around the face and added some bangs.

To make the face, I cut eyes and a mouth out of felt and glued them on.

Plastic Easter Egg Snakes


SOURCE:  http://mommymeatloaf.blogspot.com/


Grab some line and some plastic egg halves
String the eggs onto the line.
Turn the very last egg backwards to give it a "finished" look and tie a knot.
Paint a face on it and glue on a piece of ribbon to make a mouth.

Wednesday, June 16, 2010

Paper Bag Pinatas

paper bag pinatas

ages 3-6 

supplies

Small brown paper bags, candy, yarn, crayons, decorative materials of parent's choice

activity detail

Give your child a small brown paper bag and let them decorate it how they want. This can be elaborately, with sequins and glitter, or simply, with crayons. Put a few pieces of candy in the bag and close by folding over the top. Punch two holes at the top and run enough yarn through the holes to be able to hang it from a high place and still be at children's height to swing at.

Tuesday, June 15, 2010

Snacklaces

Source:   http://www.savvysource.com/activities/activity_a1-2i114_CreatingSnacklaces

creating snacklaces

ages 2-6 

supplies

Yarn or string, pretzels or Cheerios

activity detail

This is a slightly more nutritious variation of candy jewelry. Cut yarn or string in different lengths for your child to wear as a necklace or bracelet. Let your child decorate it by stringing on Cheerios or small pretzels. Make extras - they're fun to carry around for your child to nibble on!

Clothes Pin Names

Source: http://www.savvysource.com/activities/activity_a1-2i49_ClothesPinNames


ages 2-6 

supplies

A clothes pin for each letter in your child's name, paper.

activity detail

Write each letter of your child's name on a separate clothes pin. On a piece of paper, write your child's name. Mix up the clothes pins and have your child find each letter in their name, match it to the letter on the paper, and clip it on the paper. For an added challenge, add extra letters on clothes pins that your child will have to eliminate from the pile. This activity is a great way for kids to learn to identify the letters in their names.

Friday, May 14, 2010

Terra Cotta Pot Bird Feeders

Source: http://www.inspiremecrafts.com/inspireme_crafts/gotta-make-itwith-the-kids/page/2/

MATERIALS:
large terra cotta pot bottom
medium terra cotta pot
paint
2 medium sized wooden balls with holes
wire
paint brush
strong adhesive, glue gun

OPTIONAL: beads, paper, decoupage

HOW-TO:
1. Start by painting your terra cotta pots and the wooden balls. Allow to dry.
2. If you are a talented painter, or would like your children to do it, you can decorate your pots with designs. If you are like me and can't draw or paint, you may choose to decoupage some paper onto it. If you decide to take this route, I suggest cutting the paper into triangles or squares and overlapping them. Put the decoupage on both sides and keep overlapping until you have your desired look. Allow to dry.
3. Take your wire ( I used about 1 yard and cut off the excess after I was done with the whole process) and stick one end through the wooden ball. String the wooden ball all the way to the middle of the wire. Then take both ends of the wire and insert them into the large opening of the pot and through the little hole on the bottom of the terra cotta pot until the ball is up against the pot. (see picture for clarification). Then take the two wires and insert into the second ball. Bring ball down until it is at the bottom of the terra cotta pot. There should now be one ball in the inside of the pot and one on the other side all connected with the same wire.
4. Take your extra strong adhesive, or glue gun, and apply to the large open rim of the terra cotta pot. Quickly stick it to the center of the large terra cotta pot bottom. Let dry.
5. If you choose, add some beads to the wire and tie a knot at the top.
6. Add some bird seed and hang! Let the birds enjoy and start your bird watching.

Fishies


Mommy put some toothpaste in a Ziploc bag and I squished it all up. While I did that Mommy cut a fishbowl shape out of construction paper. We glued the Ziploc bag to a piece of construction paper then we glued the fish bowl on top of it. I stuck some of my foam fish on it and we were finished.


Source: http://www.internettoddler.com/category/arts-crafts

Toilet Paper Tube Poinsettias


Source: http://preschool2prek.blogspot.com/search/label/Arts%20and%20Crafts

Poinsettia ornaments out of toilet paper tubes. We cut five equal slits about 1 inch wide and stopped one inch before the end of the tube. The trimmed each slit on one end to resemble a petal. My youngest painted his with red acrylic paint on both sides (he was eager to paint and did not let me trim the petals on this one).


Before drying, we sprinkled red glitter all over the petals and laid them to dry in a box.

Handprint Turkey


http://busymomsblog.com/category/toddler-art-and-craft/

Plastic Spoon Flowers

Source: http://www.cool-kids-craft-ideas.com/plastic-spoon-flowers.html#lily

Water Lily
This one looks great sitting on your table. Place it on a blue mat or paper to simulate the look of water.


Supplies
14 Plastic Spoons
Decorative Button or Paper
Green Felt
Sturdy Scissors or Diagonal Cutters
Hot Glue
Thin Cardboard

How to Make a Plastic Spoon Water Lily
Cut the stem portion of the spoon off leaving about 1/4" for gluing.
Cut a piece of cardboard into a circle shape 3 inches in diameter.
Using the hot glue, glue 5 spoon bowls on the outer edge of the circle cardboard spacing evenly around the circle.
Take five more spoon bowls and glue these in between the first 5 spoons slightly in closer to the middle of the circle. For this layer, angle the spoons slightly upwards.
Glue the last four spoons onto the cardboard. Again angling the spoons higher and in closer to the middle.
Glue on a decorative button for the middle of the flower.
Tip: You can also use card stock or craft foam and decorate it anyway you want.
Lastly, cut out two leaf shapes with green felt. Glue these to the bottom of the cardboard.
Another flower craft idea for this one is to use colored spoons. You can alternate with white and your choosen color and make your water lily all one color.


Tulips

This one is fairly simple and the younger kids can give it a try. You will need an adult to help with the hot glue gun.

Supplies
1 Plastic Spoon per tulip
Permanent Marker or Paint
Green Pipe Cleaners

How to Make Plastic Spoon Tulips
Paint the back bowl side of the spoon the desired color for your tulip. Let this dry completely.
Using a complementing color, paint a triangle starting from the edge of the top of the spoon and come down to a point for the triangle. This will create the look of a tulip.
Paint the handle green to create the stem.
Fold a pipe cleaner into leaf shapes and wrap it around the stem.
Just stick your tulip in a styrofoam ball to display this cute flower. You can make a vase as well and use floral foam or clay to hold in place.


Roses
The directions below are for the roses with a "slumped" petal which requires working with a candle and is intended for older kids with supervision. If your younger child wants to try this craft, you can do this without using a candle.

Supplies
8 Plastic Spoons
Permanent Marker or Paint
Sturdy Scissors or Diagonal Cutters
Hot Glue
Candle
Green Tissue Paper
Ribbon

How to Make Plastic Spoon Roses
To create a petal look (called slumping the spoon), light a candle and hold a spoon about 2" above the flame. The spoon should be bowl side down facing the flame.
Hold the spoon to where the tip of the spoon is receiving the heat. Hold in place until you see the spoon "slump".
Remove the spoon from the flame and press the tip against a hard surface (like the the table) to bend the tip back to create the petal.
Tip: For the first two spoons, bend back only slightly. These will be the center of the rose.
Paint your spoons the color you want (if using white spoons). Color the folded part of the petal (where you bent it back) a slightly darker matching color.
Hot glue your first 2 spoons together keeping the handle on the spoon.
Slump your next two spoons creating a slightly larger fold in the petal. Paint the spoons. Cut off the handle of the spoon leaving about 1/2" for gluing to the first two spoons.
Glue these two spoons to the first two spoons but place these so they are on each edge of the first two spoons (meaning facing each other but in the opposite direction of the first two spoons.
Repeat steps 6 and 7 for the remaining spoons creating a larger slump with each row of petals. Be sure to glue these on the opposite side of the last set of spoons.
Lastly, wrap the tissue paper around the stem and part way up the rose to cover all the edges of the cut spoons. Tie it off with a bow and give this to mom for Mother's Day or Valentine's Day.


If you want to do this rose craft without the candle and slumping of the petals, simply follow all the steps above skipping the slumping. You will still get a beautiful rose but it will be more of a rose bud without the petals opening. We placed a small pine cone in the center of ours to give it a different look.

Lid Wind Chimes


Source: http://www.cool-kids-craft-ideas.com/sensory-crafts-sound.html#wind_chimes
Supplies
3 large canning lids (the flat insert piece)
10 small canning lids (the flat insert piece)
1 large canning lid band (the part the twists on the jar)
Metal Paint (like Rustoleum)
Ribbon or String
Glitter Glue
Scissors
Hot Glue

How to Make Wind Chimes
Paint all the lids with rustoleum paint and let dry.
Using glitter glue, write out your message or decorate the lids as you want. Use the larger lids for the first letter of each word.
We used the words Peace, Love and Hope on one side and Faith, Life and Wish on the other side.
Cut 3 long strips of ribbon (long enough to hold all the lids for each word.
Hot glue the lids to the ribbon leaving enough of the ribbon to tie to the lid band and some to hang from the bottom.
Tie each ribbon to the lid band in different spots. Tie another piece of ribbon to the band for hanging.
Hang your wind chime somewhere outside to catch the wind and make some noise.

Pine Cone Hyacinth

Source: http://www.cool-kids-craft-ideas.com/flower-crafts.html

Supplies


1 Pine Cone (per flower)
Colored Tissue Paper
Green Construction Paper
Colored Aluminum Foil (or colored paper)
Plastic Tub (like from margarine)
Scissors
Glue
Pencil
Ribbon or Bow


How to Make a Pine Cone Flower

Place the tub on the aluminum foil and wrap the foil around the tub. Fold over the end into the inside of the tub to hold in place and cover the rim.
Tip: If you use paper instead of foil, just use double stick tape to hold it in place. Fold the end of the paper into the tub and tape in place.
Glue the pine cone into the plastic tub.
Tip: If you have a smaller pine cone, just build up the inside of the tub with flower foam and then stick the pine cone in a bit to hold in place.
Cut the tissue paper into 1 1/2 inch squares. Place the eraser end of the pencil in the middle of the square and twist the tissue paper by twirling the pencil.
Dip the pointed end of the tissue paper into glue and stick it between the pine cone petals. Repeat this until the pine cone is completely covered with colored tissue paper.
Cut leaves from the green paper and glue in place.
Wrap a ribbon or place a bow on the outside of the pot.

Odds and Ends . . . Sources Unknown!